Connect Shopify with WhatsApp
Simplify your order management by integrating Shopify with WhatsApp through Mark360’s smart chatbot. Collect, manage, and automate your store orders directly from chat.
Overview
Integrating Shopify with WhatsApp allows your business to automate the order collection process effortlessly.
From creating new orders to updating tags or generating draft orders, this guide walks you through every step of setting up the connection and enabling real-time store interactions within your chatbot.
With this integration, customers can browse, order, and receive instant updates — all through WhatsApp.
Generate Shopify API Key & Secret
To integrate your Shopify store with Mark360, you’ll first need to create a private app in your Shopify admin to obtain the API Key and Secret Key.
Step-by-Step Guide
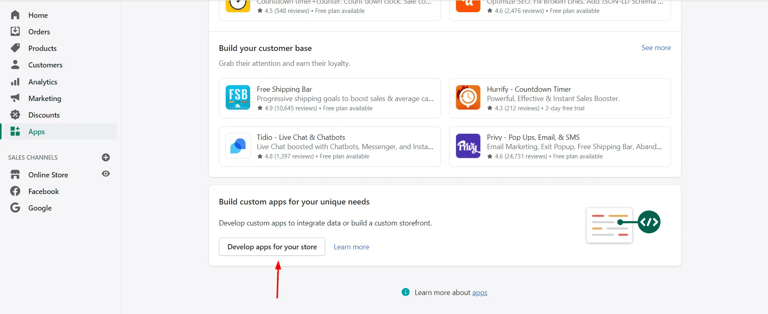
1. Access the Shopify App Settings
Log in to your Shopify Admin Dashboard and open the Apps section from the left-hand sidebar.
Scroll down to the bottom and click on Develop apps for your store.
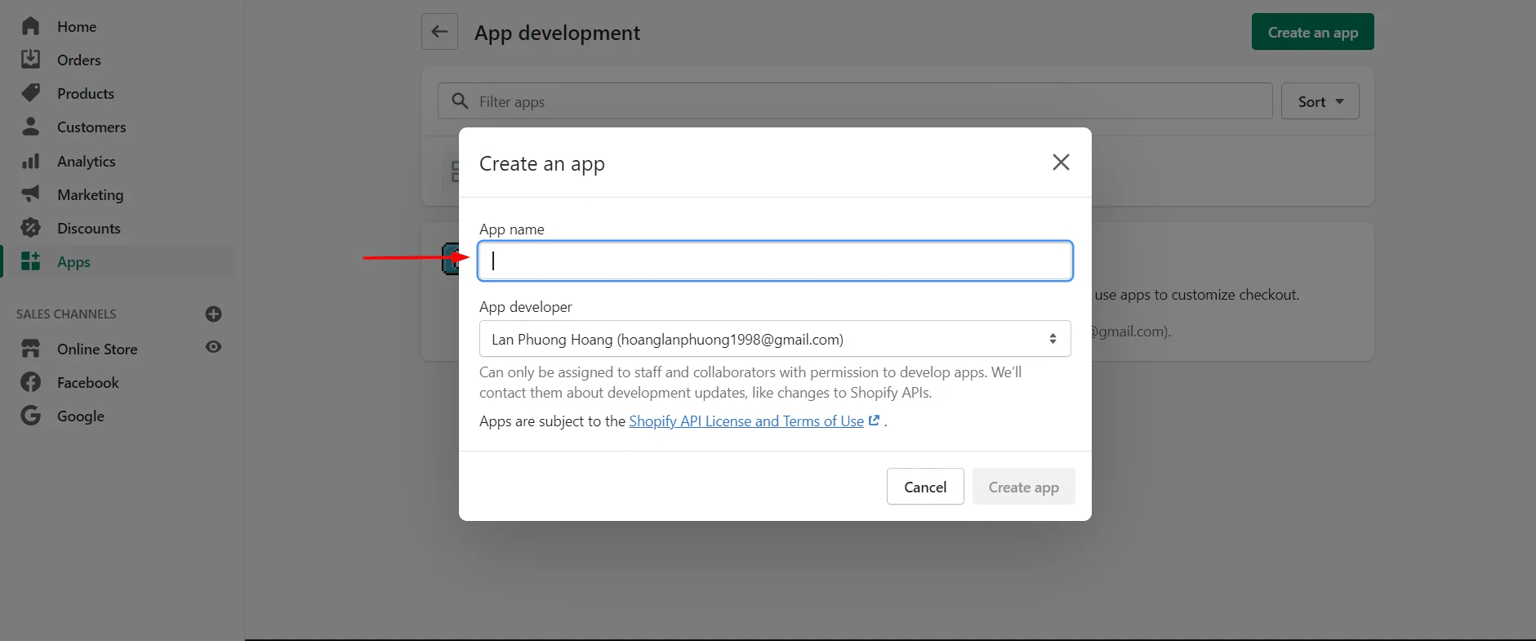
2. Create a New App
Click on Create an App, then provide a name for your app — for example, Mark360.
Once done, click Create App to proceed.
3. Configure API Permissions
After the app is created:
- Open the API Credentials tab.
- Scroll to the Access Tokens section and click Configure Admin API access.
- Under Admin API Scopes, enable all permissions that start with
Read_andWrite_(where available). - Scroll down and click Save to apply the permissions.


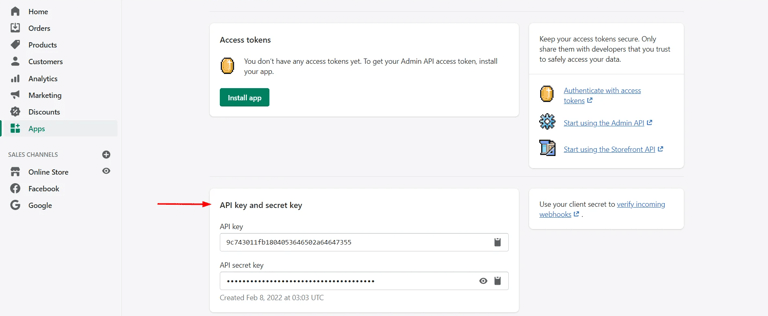
4. Retrieve Your API Credentials
Once saved:
- Return to the API Credentials tab.
- You’ll now find your API Key and Secret Key (also referred to as Password) listed on the screen.
Important: Copy and store these credentials securely — they will be required when connecting Shopify to your Mark360 workspace.
You’ll only need to perform this setup once. The same credentials can be used across multiple Shopify automation workflows inside Mark360.
Connect Shopify
Automate your Shopify store operations directly from Mark360’s Flow Builder.
Manage orders, drafts, products, shipping, and metadata effortlessly — all within a single workflow.
How to Configure
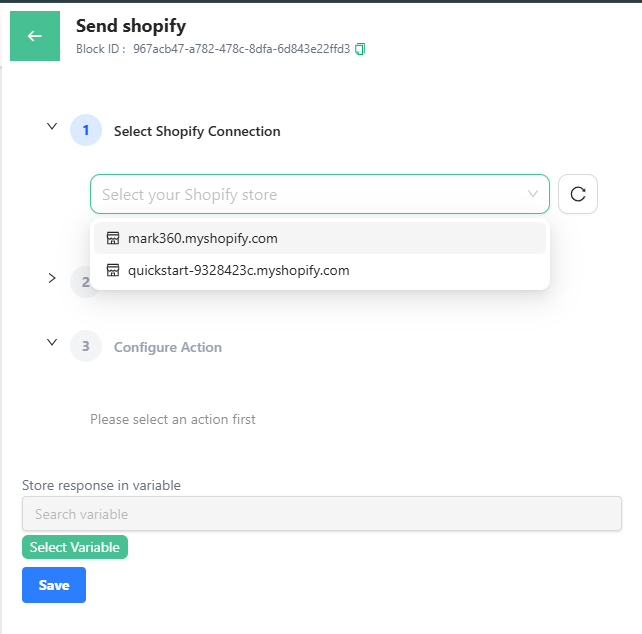
Step 1: Select Shopify Connection
Choose your connected Shopify store from the dropdown list.
If you haven’t connected one yet, navigate to Connections → Shopify and add your API Key and Secret credentials.
Step 2: Select Action
Once connected, select the type of Shopify action you want to automate.
These actions are grouped into categories for easier navigation.
Available Actions
Order Management
| Action | Description |
|---|---|
| Create Order | Automatically creates a new order in Shopify when a customer confirms purchase details. |
| Update Order | Updates existing order details such as payment status or delivery address. |
| Fetch Order Details | Retrieves specific order information from your Shopify store. |
| Cancel Order | Cancels an existing customer order. |
Draft Orders
| Action | Description |
|---|---|
| Create Draft Order | Creates a draft order before payment confirmation. |
| Complete Draft Order | Converts a draft order into a finalized order once the customer approves. |
| Update Draft Order | Modifies existing draft order details such as pricing or quantity. |
Inventory & Products
| Action | Description |
|---|---|
| Fetch Product Details | Retrieves product information including title, SKU, and price. |
| Fetch Product Variants | Gets available product variations (like size, color, or type). |
Shipping & Logistics
| Action | Description |
|---|---|
| Fetch Tracking Details | Fetches live shipping updates and tracking information for orders. |
Tags & Metadata
| Action | Description |
|---|---|
| Replace Order Tags | Replaces or updates tags assigned to specific orders. |
| Add Order Note | Adds a custom note or message to an order. |
| Update Metafields | Updates or modifies product or customer metafields for additional data. |